Showing posts with label IITG Blog. Show all posts

Friday, 1 April 2016

April Fools!

For some reason i felt like writing this one. Below are 10 April fools jokes you can play on your fellow IT staff... because... why not? They're not in any particular order. Actually, that's not true. They're in the order i wrote them.

10. Swapping Keys on the Keyboard


Make their lives a little more difficult by swapping keys that are side by side. Swapping the "n" and "m" key are quite good as well as the "u" and "i" keys.

Don't swap keys like the QWERTY keys or the sequenced keys like 1 to 0 etc and you'll be fine. With any luck they'll lock an account and won't know why.

9. Turn it up LOUD!


If they tend to walk away with their computer unlocked, turn all of the volume sliders up on their PC. To send it over the top, turn their volume up on their speakers. Don't turn the volume up loud enough that you can hear the speakers without anything playing.

The next time they get an alert, it'll probably scare them half to death.

8. Rotate Their Desktop


This one is just plain annoying and that's what makes it funny. Open their display settings and rotate their desktops into portrait mode (or landscape if they're using portrait).

Keep your phone handy because it's likely they'll rotate their head to try and fix it because it's less of a pain in the ass than rotating their monitors.

If you want to get them back, you can do what i did and rotate your monitor(s) and leave it like that.... FOREVER. hahaha reverse BURN!

7. Fake Blue Screen of Death


Go here (on their computer), follow the instructions and thank me later.

6. Wireless Keyboard


Plug in a wireless transceiver into their computer and you can use your wireless keyboard while they're using their own keyboard. Imagine watching them trying to type their password while your pressing an extra key in the background. Randomly open windows explorer etc using shortcuts. Hours of fun for everyone! except the person being pranked.

5. Tape The Bottom Of The Mouse


Place some tape on the bottom of the mouse and watch as they're unable to move the cursor on the screen. If your the IT guy, prepare a second mouse as well.

When they inevitably ask you for help, you can give them the replacement mouse. Replace their current mouse with the mouse you prepared earlier and watch the confusion that unfolds. When they come back for help again, tell them to restart their computer.

4. Steal Their Speakers


Someone did this to me once. They disconnected my speakers and ran an extension through the wall (Yes, through the wall) and into their computer. Since we were both doing the same work we're used to hearing certain sounds during certain operations. But when you start hearing those sounds, when your not doing anything at all, you'll start investigating and spend hours trying to figure it out.

You can also start playing music through their speakers as well but it'll be really obvious that something is up.

3. Disconnect The Phone


Disconnect the phone handset from the back of their phone. They'll be able to answer the phone but won't be able to hear or speak to the other person on the other end of the call.

2. Tape an Air Horn Under Their Seat


Grab an air horn and some duct tape. tape the air horn under their seat. When they sit down, they'll jump straight up again.

1. Cover their Desk


Aluminium (or Aluminum) foil, cling wrap, post it notes hell, even wrapping paper can be used to cover someones desk. Cover everything in sight individually. Trust me, it'll look awesome when it's done.

Thursday, 25 February 2016

Flexible Power Distribution on a Budget (Part 2)

Now that our switchboard is in place we need to get power to where it's needed the most and for the bulk of you, that's going to be server racks.

If you're reading this, I'm going to assume that Datacentre style overhead power distribution is out of your budget. This how I accomplish the same task.

Firstly, start with a good rack. One that's  designed for the purpose. Using a server rack designed to house servers and manage cabling at the rear is probably not the best idea for a network patching rack  which will generally have cable management at the front. After having learnt this lesson the hard way, I can't help but try to impart this knowledge onto all of you.

APC AR3100 Server Rack Panduit S6212BF Server Rack
APC AR3340 Network Rack Panduit CQSMDC79 Network Rack

While i love both APC and Panduit racks and accessories, i do tend to favour APC. Mostly because i always seem to be able to get my hands on their server racks with relatively short notice. As always, it's up to you what rack fits your needs but just remember, there's a little more to choosing a server rack that simply looking at its dimensions.

Overhead Power Distribution On A Budget


Now that our rack is sorted, I would normally turn my attention to overhead cable management'. The APC AR8560 cable trough connects securely to the top of the APC rack though you can get away with using this setup on other racks. These cable troughs should be Connected together allowing a single rack to be removed independently of your electrical circuits running overhead.


Have the electrician mount the power outlet boxes on the rearward facing side of the cable trough and you'll no longer need to pay an electricians call out fee whenever you need to move things around.


Just remember to mark your outlets so you can tell at a glance which electrical board they're connected to. I suggest using paint pens to colour in part of the outlet box and colour part of the electrical board cover to match. I like to use red for UPS power and blue for mains power.

Earthing


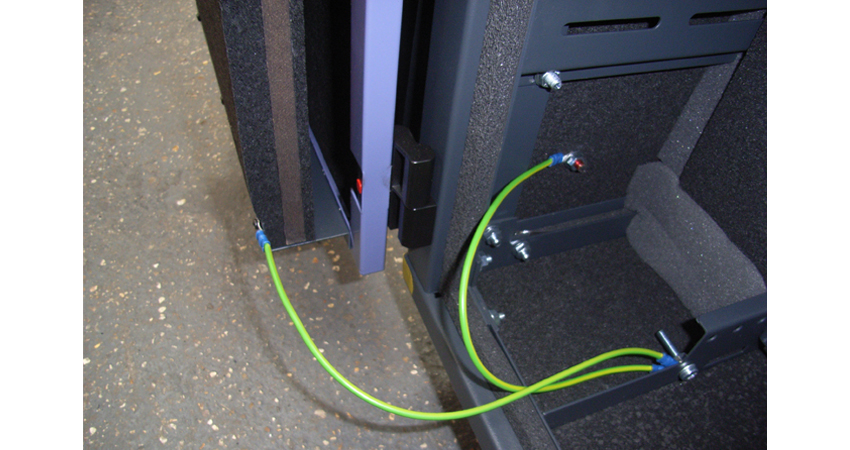
The most important part of your install should be your earthing system. It's a safety system which should never be overlooked and your plan for this system should be discussed with your electrician.

Without your direction, the electrician will run a dedicated earth from the electrical board to your server rack and use a self tapping screw and appropriate washer to earth your server rack and yes, it does work but anything beyond that will generally be your problem to deal with not theirs.

If your thinking "well, I don't know anything about this stuff" I have some suggestions below.

Piggyback Style Earthing


The piggyback style is generally going to be the cheapest. Mostly because it can be wrapped into other jobs (like running a new circuit) for relatively little labour. It also requires the least amount of additional consumables.


Despite being easy on the hip pocket, you potentially introduce additional resistance into your earthing system and by piggybacking your earth, you are creating a number of potential points of failure. Severe a link in the chain and you compromise everything that was piggybacked to it.

Not good. Let's try and float another idea shall we?

Earth Your Overhead Power Distribution System


Consider having your electrician earth your overhead power distribution system. Why you ask? Your overhead power distribution system is unlikely to be moved. If your power is also terminated here then it absolutely cannot be moved without the assistance of an electrician.

Accidents happen and by being higher up means it's less likely to be damaged by an ignorant mug like me. I don't know about you, but it seems like a safe bet.

The astute among you are probably thinking that the overhead cable management still needs to be piggybacked together so there's still a flaw isn't there? You'd be correct, however it is mitigated to a certain degree.

Finally, if you disconnect a rack (for removal) there is no risk of compromising the rest of the system.

Copper Bus Bar System


Essentially this is a long square/flat bar of copper dipped in tin to inhibit corrosion. Suppliers normally sell these in different lengths but you can also ask them to cut them down to the size you need with a variety of different hole spacing (NEMA, BICSI etc). I personally try to avoid cutting them if I can as it saves time and money.


When it comes to mounting, there are a few ways to mount them. For me, the most important thing to remember is to secure it to your overhead power distribution so the racks can still be removed independently of your bus bar.

How many you choose to install is up to you, but at the very least you'll need one per row. This will ensure your devices have a clean and solid connection to mother earth.

While your at it, you should pick up some ring terminals, a crimping tool, ground wire (min 2.5mm or 13 gauge but no more than 4mm or 11 gauge) and probably a small wire brush or sandpaper  to ensure the surface is clean. You'll need to earth PDUs, UPSs, Network gear, Blade chassis etc so it's better to spend a few bucks on tools and do this part yourself.

Flexible Power Distribution on a Budget (Part 1)

One of the most common questions that's asked by literally no one is what's the best way to power my server room?

Over the years I've probably powered server rooms every which way you can think of and there definitely isn't a one size fits all solution to the problem.

Today, I'm going to walk you through a couple of different solutions which will hopefully make this decision just that little bit easier.

The Pay As You Grow Model


In most small scale installations an electrician is brought in, installs a circuit breaker at one end, an outlet at the other and runs some cable (generally single phase) between the two. Once he's finished, he hands you a very large bill and calls it a day.

... 250 million metres of cable? 1 bazillion hours of labour? You can scarcely believe your eyes! Surely this can't be real... But you pay it despite lamenting over the fact that you'll have to pay it again when you add another rack.

When you eventually start adding extra servers, racks, electrical circuits,  switching, SAN and a blade center, you end up in one or more of the following situations:


  • You cannot effectively manage your energy usage efficiency ratio's
  • You run out of space in your electrical board for new circuits
  • You run out of capacity (amperage) in your electrical board
  • You destroy your budget due to additional, unaccounted for electrical works.


Planning Starts From The Beginning


Let's rewind the clock to when your office/server room fit out is first taking place. Actually, let's rewind the clock even further to when we're planning the electrical for the floor. It's at this time where you should be considering how the server room should be powered because in many cases, you'll only get one shot.

Ensure you share your plans with the electrician or electrical engineer at every step of the way. If not, you could end up with a bunch of standard 10 amp single phase circuits.

Going too small will not only limit your options in the future, but you also risk overloading the circuit. Conversely, going too large may limit your equipment choices down the road and put a larger dent into your pocket than you expected.

Using A Dedicated Electrical Board


If you're installing an electrical board for the entire floor, chances are they need to run a new circuit up to your floor from the meter room. If they're going to all that trouble, now might be a good time to run an additional line straight into your server room and connect it to a new electrical board.

If Joe bloe decides to switch the power off to a circuit and gets the wrong one, at least you know he's not going to be messing with your server room. Yes, I've seen this happen, by an electrician funnily enough. We can laugh about it now though.

Also, by obtaining our own dedicated feed, we can cater for much larger amount of growth than we would have been able to otherwise.

Secondary Electrical Board


The above option may not always be available to you. If that is indeed the case, I normally opt for running ONE massive three phase circuit (the bigger the better) from your existing electrical board to a shiny new electrical panel inside your server room.

You can of course mount the panel outside if you want but subsequent new runs will require more labour, more materials and will probably look ugly. Mind you, it'll probably still look ugly inside the server room but fewer people will notice.

Don't Forget The UPS!


If you have a bare wire UPS output, don't forget that a separate electrical board  can also be used to distribute UPS power to your racks! Connect your UPS to the electrical board (to where mains power would normally be connected).

Just remember to use an appropriately sized electrical board. Using the same size as your mains electrical board may be overkill although I will admit, it would look perfectly symmetrical.


*ahem* Just remember, your UPS will always power less than your mains electrical board. Don't believe me? In part 2, we'll discuss overhead power distribution from the switchboard to the equipment.

Sunday, 4 October 2015

Rack 2 Rebuild

If you haven't already read it, i suggest reading about the BW Rack 1 Rebuild because all of the nitty gritty is covered in that blog post.

The only difference with this rebuild is the fact that we pre-cabled every single port and put cable labels on both ends of each network cable.

Before The Rack 2 Rebuild


And the moment you've all been waiting for...

After The Rack 2 Rebuild


The middle of the server rack.

The lower half of the server rack.


The top of the server rack before we re-routed the pesky electrical conduit.


And the front of the rack 2 server rack. Doesn't that look nice?


Took two people a day to get that done but i'm sure you can agree it looks great.

IITG 

Rack 1 Rebuild


So how do we do it? and why do we do it?

That's easy. How we do it is listed below. Why we do it, is pretty simple. It makes maintenance easier, troubleshooting easier, and it just looks like it's something that you can really be proud to show off.

Planning

This all starts as most things start, with an Excel spreadsheet. I find that a spreadsheet allows me to visualise exactly which RU the equipment will be loaded into. After all, it's better to shuffle machines around in a spreadsheet than it is once the servers are in place.

When finding a home for a piece of equipment, there's a couple of things i try to keep in mind. I try to load all of the equipment as close to the middle of the rack as i can with the most frequently accessed pieces (such as an LCD KVM) mounted closer to the middle so your not having to bend down or look up to use them. I will leave a space or two here and there for additional pieces of equipment but those with a lot of potential for expansion (such as a SAN) i will load at the edge. This of course means that I'll generally fill a rack with a maximum of two pieces of equipment which have a large potential for expansion. It's at this stage that a capacity plan could really come in handy. Unfortunately, i never seem to have one so i do my best with the information i have at the time and add an extra RU or two where i can.

Rack UPSs

When it comes to a rack UPS, i mount them at the bottom of the rack. Pretty simple really, they're usually quite heavy and by mounting them lower down they're easier to slide in and out. At least, that's what i think. Usually i mount these UPS systems by myself and i find it easy. With two people, it should be no problem.

Patch Panels / KVMs etc

I keep my patch panels, KVMs etc for smack bang right in the middle of the rack. Why? because it allows to me to purchase standard length cables which are readily available. Sometimes you forget to order enough, or new equipment is added after you've finished planning and it's more likely you'll have a few of these shorter cables just lying around.

Once all of the equipment locations are finalised, it's time to move onto the cabling. My spreadsheet tracks the numbers, lengths and colours of each cable that's connected to each piece of equipment. Once i'm done, i can tally up the totals ready for the purchasing. Don't think the spreadsheet just tracks network cables either. I also keep track of the quantity, length and colour of each power cable as well.

Purchasing

Server Rack

We replaced the existing server rack which was an old Dell PowerEdge rack with an APC AR3100 42U server rack. This also allows us to pre-cable and pre-load as much equipment as possible into the new server rack and simply unload the old rack, remove it from the area, 

The other benefit was the fact that the APC had Zero U mounting points allowing us to mount PDUs on one side and cable management on the other.

Cable Management

We use APC Vertical Cable Organizers for vertical cable management. There's not much to be said but i highly recommend them.

At the top of the rack, we have a 600mm APC Cable Trough. The electricians use the cable trough mainly. Also, the the outlet boxes are mounted to the cable trough.


APC cable troughs, when connected together allow the server rack to be removed independently of the electrical. When the server rack was replaced, we needed electricians onsite to disconnect and relocate the outlets. With the outlets mounted on the cable trough, the electricians are no longer required when replacing the server rack. Below is what the top of the server rack used to look like and as you can see, there's no way around getting the electricians onsite without that cable trough.


We used a ton of velcro cable wraps for data cables and cable ties for power cables, SAS cables etc. Buy this stuff in bulk because you'll rip through the stuff quite quickly if you want your installation to look neat.

Also, replacing cable ties is annoying. Use them only where necessary.

PDUs

We used a pair of APC AP8959 Switched IP PDUs. In a 240v single phase environment with 20amp circuits these are probably the best for the job. In this environment, they'll handle up to 16 amps each which is enough to meet the CTO's needs.

One of the PDUs (the inner most one) is connected to a UPS while the other is simply connected directly to mains power.

KVM

We purchased a 16 port Dell 2162DS IP KVM. It's cheap and nasty but does the job. I have to say, it was my first time dealing with it and i probably don't want to re-use them ever again. Check out the marketing video. It played no part in selecting the KVM but here you go:


You might be wondering, what happens when you have more than 16 servers in a rack? Well, either you upgrade the KVM or you designate one SIP to be a 'floating' SIP to quickly connect to the new servers.

Before you ask why not just buy a bigger KVM? It wasn't an option and the CTO is quite happy to upgrade when necessary.

Rack UPS

Again we turn to Dell for a UPS. From memory it was a 1920w line interactive UPS. We also added an Extended battery module (EBM) and an network management card so it could be remotely managed and monitored. We also purchased a Dell temperature probe to keep track of the temperature within the rack.

While you might seem to think that this would be quite small, you need to remember that this UPS is connected to just one PDU and therefore only needs to power HALF the total power demand of the rack.

During post installation testing, we were at 1 hour of battery backup time for the entire server rack. This far exceeded the 20 minute requirement set by the CTO. Without the EBM though, we were at 15 minutes of battery backup time. The system can't be expanded beyond this capacity. You get what you pay for, nuff said.

Pictures Before The Rebuild


After The Rebuild


Although the picture doesn't show it, we wrapped the IEC leads connected to the outlets in the same colour as their feed cable (Red or Blue). This ensures you always know your dealing with the right power outlet.

You can also clearly see the status of those two outlets without opening the doors. This was something that wasn't possible with the old setup.


And this is the front of the server rack. In the end, we ditched the Dell covers on the front of the servers. I'm sure there's plenty of good reasons to do it such as airflow, better visibility of status lights etc. The real reason though was that they look ugly.


And then before and after. You'll also notice we scrapped the Dell cable management arms. I'm sure there's plenty of good reasons to do it such as airflow, better visibility of status lights etc. The real reason though, well, you know why.


And that's how you rebuild a server rack, costs a little bit but so much easier to work on than what was there before.

IITG

Saturday, 26 September 2015

Who Is The Ignorant IT Guy

An IT guy who's been in the industry for over 10 years. I left school after year 10 and started working packing computers into boxes for Acer before being moved to the production line building and imaging the computers. Earning a little over $200 AUD and being 17 years old at the time, obviously i felt like a millionaire being able to purchase random crap for myself, my girlfriend and my friends.

As my contract with Acer finished, i found work at a local sports centre. I was able to use the facilities for free, and learn about linux by implementing an LDAP domain, internal DNS/DHCP, VPN and a generic fileserver.

I managed to someone secure an interview with a medical company and began work as a helpdesk engineer. In under two years, i had received four promotions making it to a linux systems administrator by hard work and hands on self education.

I've had no formal training prior to entering the industry and still continue in this fashion. I've pretty much learnt everything i know from just getting stuck in and finding out what works and what doesn't.

Generally when something doesn't work, i need to get it fixed as fast as possible. Preferably before anyone notices.

That's who i am. That's why i do what i do. I don't claim to be an expert on anything so don't assume i am. I don't claim to be anything really.

I set this blog up to share my experiences and hopefully expand my knowledge by sharing my thoughts with you and hopefully being corrected at the same time.

IITG